


How to Screenshot on Windows, Mac, Chromebook, iPhone, and Android
Are you tired of trying to figure out how to take a screenshot on your device? Do you find yourself getting frustrated with the different methods and key combinations? You're not alone. Taking a screenshot can be a daunting task, especially if you're new to a particular device or operating system. In this article, we'll break down the simple steps to take a screenshot on various devices, including Windows, Mac, Chromebook, iPhone, and Android.
The problem is that each device has its own unique way of taking a screenshot, and it's easy to get confused. You might be trying to take a screenshot of a funny meme on your phone, but you can't figure out how to do it. Or, you might need to take a screenshot of an error message on your computer, but you're not sure what keys to press. Whatever the reason, taking a screenshot can be a frustrating experience if you don't know how to do it.
In this article, we'll solve this problem by providing a step-by-step guide on how to take a screenshot on various devices. We'll cover the different methods for each device, including keyboard shortcuts and button combinations. By the end of this article, you'll be a pro at taking screenshots on any device.
- Taking a Screenshot on Windows
- Taking a Screenshot on Mac
- Taking a Screenshot on Chromebook
- How to Take a Screenshot on an Android Device
- Taking a Screenshot on iPhone/iPad
- For iPhones Without a Home Button (Face ID Models)
- For iPhones With a Home Button
- AssistiveTouch Screenshot (Alternative Method)
- Editing and Sharing Screenshots on iOS
- Additional Features for iOS 14 and Later
- Pro Tips for Screenshots on Any Device
- Conclusion
Taking a Screenshot on Windows
Taking a screenshot on Windows is relatively easy. Here are the steps:
Full Screen Screenshot
- Press the Print Screen (PrtSc) button, usually located on the upper-right side of the keyboard.
- The screenshot will be saved to the clipboard.
- Open an image editing program, such as Paint, and press Ctrl + V to paste the screenshot.
- Save the screenshot as an image file.
Partial Screen Screenshot
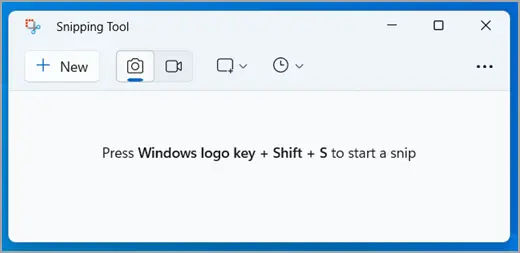
- Press Windows + Shift + S to open the Snipping Tool.
- Select the area you want to capture by dragging the cursor.
- The screenshot will be saved to the clipboard.
- Open an image editing program, such as Paint, and press Ctrl + V to paste the screenshot.
- Save the screenshot as an image file.
Taking a Screenshot on Mac

Taking a screenshot on Mac is a bit different from Windows. Here are the steps:
Full Screen Screenshot
- Press Command (⌘) + Shift + 3.
- A file labeled "Screen Shot" will appear on your desktop.
- The screenshot will be saved as a PNG file.
Partial Screen Screenshot
- Press Command (⌘) + Shift + 4.
- Drag the cursor to select the area you want to capture.
- To capture a specific window, press Command (⌘) + Shift + 4, then press the Spacebar and click on the window.
- The screenshot will be saved as a PNG file.
Taking a Screenshot on Chromebook
Taking a screenshot on a Chromebook is easy and straightforward. Here are the steps:
Full Screen Screenshot
- Press Control (Ctrl) + Show Windows (a rectangle with two lines to the right, usually in the top row of the keyboard).
- The screenshot will be automatically saved to the Downloads folder, accessible via the Files app.
- It will also be copied to your clipboard temporarily. You can paste it directly into supported apps (e.g., Google Docs, Slides, or image editors).
Partial Screen Screenshot
- Press Control (Ctrl) + Shift + Show Windows.
- Your cursor will change to a crosshair. Drag to select the area you want to capture.
- The screenshot will be saved to the Downloads folder and temporarily copied to your clipboard.
Editing the Screenshot
- Open the screenshot in the Gallery app (default on Chromebook) to crop, annotate, or make other adjustments.
- For advanced editing, you can use web-based editors like Pixlr or Canva.
How to Take a Screenshot on an Android Device

Taking a screenshot on an Android device is simple and works consistently across most models. Here are the steps:
Full Screen Screenshot
- Press the Power Button + Volume Down simultaneously.
- Hold both buttons for about 1-2 seconds until the screen flashes or you hear a shutter sound.
The screenshot will be saved automatically in the Screenshots folder in your Photos or Gallery app.
Some devices may offer a Screenshot option in the Power menu:
- Press and hold the Power button, then tap Screenshot from the menu.
Partial Screen Screenshot (Available on Some Devices)
- Open the screen you want to capture.
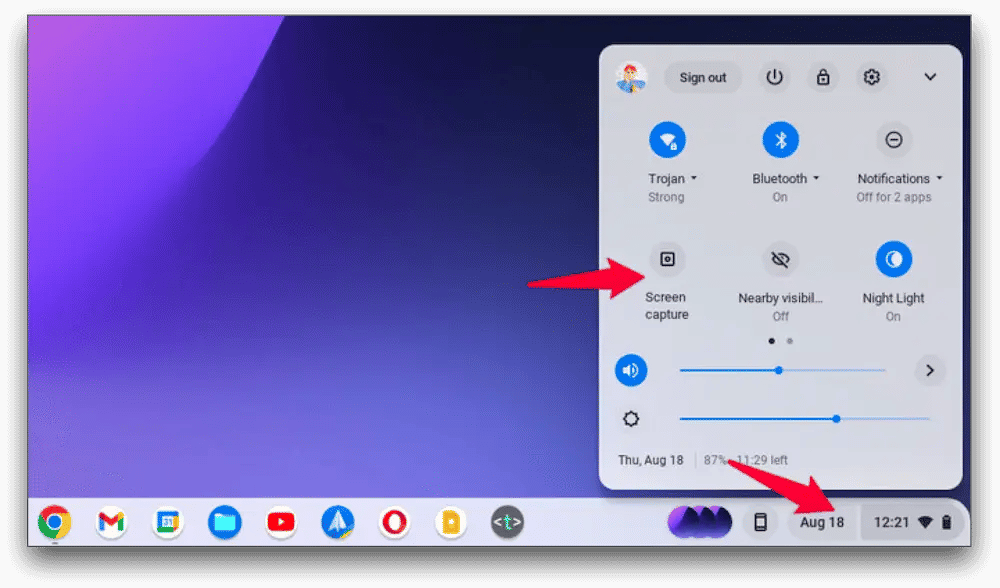
- Swipe down to open the Quick Settings panel and tap Screenshot (if available).
- On supported devices (e.g., Samsung or OnePlus), you can crop or edit the screenshot immediately after capturing.
Editing the Screenshot
- Use the built-in photo editor in your Photos or Gallery app to crop, draw, or highlight parts of the screenshot.
- For more advanced editing, use apps like Canva or Snapseed.
If you're interested in learning more about Chromebook features, check out our articles on How to Download Google Chrome or How to Clear Cookies on Google Chrome.
Taking a Screenshot on iPhone/iPad
Taking a screenshot on iPhone or iPad is easy. Here are the steps:
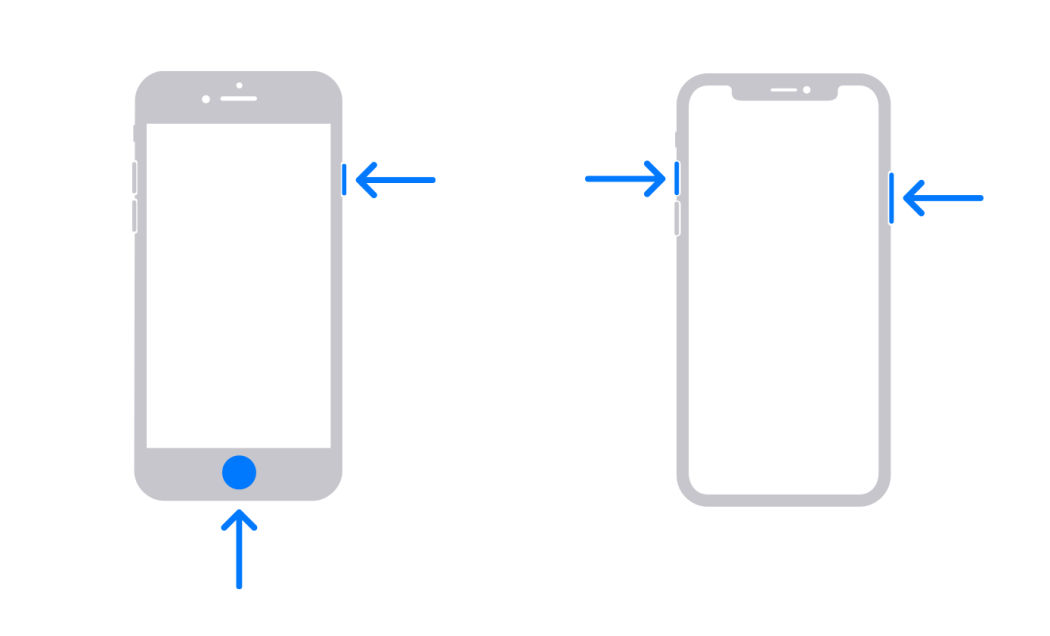
For iPhones Without a Home Button (Face ID Models)
- Press and hold the Side Button (Power) and Volume Up button simultaneously.
- Release the buttons quickly. You’ll see a thumbnail of the screenshot in the bottom-left corner of the screen.
- Tap the thumbnail to edit, annotate, or share the screenshot immediately. If you don’t tap, the screenshot will automatically be saved to the Photos app.
For iPhones With a Home Button
- Press and hold the Home and Sleep/Wake buttons simultaneously.
- The screenshot will be saved to the Photos app.
AssistiveTouch Screenshot (Alternative Method)
- Enable AssistiveTouch:
- Go to Settings > Accessibility > Touch > AssistiveTouch and toggle it on.
- Add Screenshot to the AssistiveTouch menu:
- Tap Customize Top-Level Menu, then tap an existing icon or the "+" to add a new one. Select Screenshot.
- Take a screenshot:
- Tap the AssistiveTouch button on your screen, then select Screenshot from the menu.
The screenshot will be saved automatically to your Photos app in the Screenshots album.
Editing and Sharing Screenshots on iOS
- After taking a screenshot, tap the thumbnail to open the editing tools.
- Use the Markup tool to annotate the image with text, drawings, or shapes.
- Tap Done to save the changes or Share to send the screenshot directly via email, social media, or other apps.
Additional Features for iOS 14 and Later
- Full-Page Screenshots: In Safari or supported apps, take a screenshot, then tap the thumbnail and choose the Full Page tab to save the entire webpage as a PDF.
Pro Tips for Screenshots on Any Device
- Organize Your Screenshots:
- Create folders in your gallery or file manager to categorize screenshots by project, topic, or date.
- Use Cloud Storage:
- Automatically back up your screenshots to cloud services like Google Photos, iCloud, or OneDrive to access them across devices.
- Annotate for Clarity:
- Use built-in editing tools or third-party apps to add notes, highlights, or arrows to your screenshots, making them more informative.
Conclusion
Capturing screenshots is an essential skill that simplifies communication and improves productivity, whether you're troubleshooting an issue, saving a funny meme, or documenting important information. By following the step-by-step methods outlined in this guide, you can take screenshots effortlessly on Windows, Mac, Chromebook, iPhone, and Android devices.
For more tips and tricks, check out other helpful articles on How to Maestro, where you’ll find guides to enhance your digital skills and productivity. Happy screenshotting!