


How to Map a Network Drive
Are you tired of navigating through complex file paths every time you need to access a shared folder on your network? Do you wish you could treat remote network folders as if they were local drives on your computer? If so, you're in the right place! This comprehensive guide will walk you through the process of mapping a network drive, making your work with shared resources much more efficient. By the end of this post, you will be able to map a network drive on your Windows 10 or 11 system, turning a cumbersome process into a breeze. Let's dive in and make your file access a whole lot smoother. If you need to download Windows 10 or 11, check out this How to download Windows 7, 10 and 11: easy and free article.
- What Does It Mean to Map a Network Drive?
- Step-by-Step Guide to Map a Network Drive
- Troubleshooting Common Issues
- Problem 1: Network Path Not Found
- Problem 2: Access Denied
- Problem 3: Drive Not Reconnecting After Restart
- Problem 4: Drive Letter Already in Use
- Additional Tips for Efficient Network Drive Management
- Regularly Review Mapped Drives
- Use Descriptive Names
- Backup Important Files
- Stay Updated on Network Changes
- Conclusion
What Does It Mean to Map a Network Drive?
Mapping a network drive is a process that allows you to assign a local drive letter to a remote network share, making it easier to access through File Explorer. Essentially, it bridges the gap between local and network drives, allowing you to interact with network files as if they were on your local machine. This feature is invaluable for businesses and individuals who regularly work with shared resources over a network.
This guide will focus on mapping a network drive in Windows 10 and 11, though the principles can often be applied to other operating systems. By the end, you'll have a clear understanding of how to map a network drive, the benefits it brings, and how to troubleshoot common issues. Let’s start by walking through the step-by-step process of mapping a network drive using File Explorer.
Step-by-Step Guide to Map a Network Drive
Method 1: Using File Explorer
Step 1: Open File Explorer
To begin, click the folder icon in your taskbar, or press the Windows key and type "File Explorer," then hit Enter to open it.
Step 2: Navigate to "This PC"
Once File Explorer is open, find and click on "This PC" on the left sidebar. This will bring you to a screen where you can see all your current drives and folders.
Step 3: Click "Map Network Drive"
In the ribbon at the top of the File Explorer window, you'll find a set of tabs. Click on the "This PC" tab and then click "Map network drive" in the "Computer" or "Drive tools" section. This opens a new window where you can specify the details of the network drive you want to map.
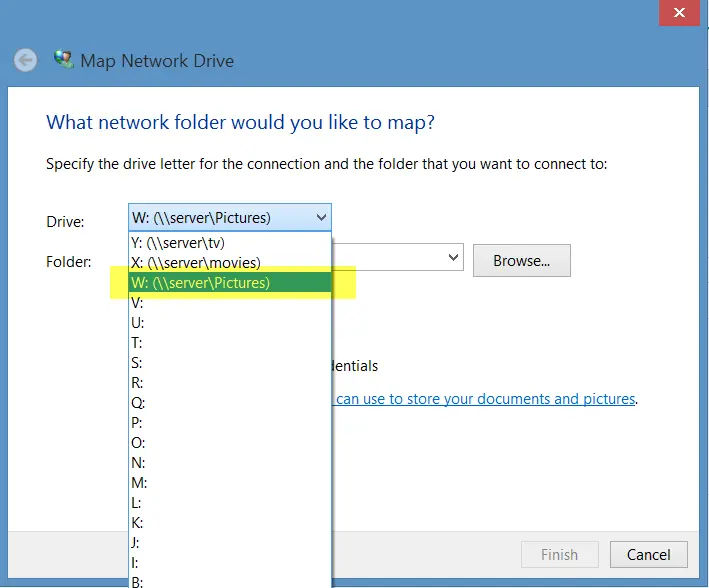
Step 4: Choose a Drive Letter
In the "Map Network Drive" window, you will see a dropdown menu labeled "Drive." From here, select an available drive letter that you haven’t used yet. Typically, letters like X:, Y:, or Z: are used for network drives.
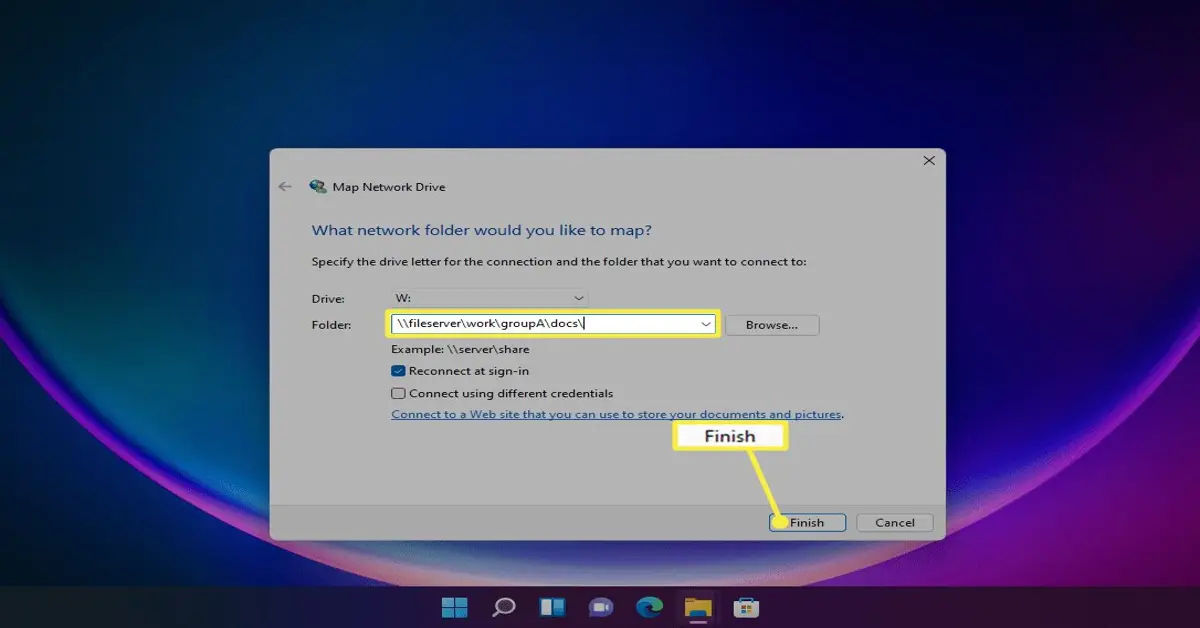
Step 5: Enter the Folder Path
Next, you need to enter the network path to the shared folder. This can be done manually by typing \\servername\foldername in the "Folder" field. If you're unsure about the exact path, you can click "Browse" to search for the shared folder on the network. If you need to find your IP address, you can refer to this article on How to find my IP address.
Step 6: Optional Settings
Before clicking "Finish," you might want to select the "Reconnect at sign-in" option if you want the drive to be mapped automatically every time you log in. If the network drive requires different login credentials, check "Connect using different credentials." This will prompt you to enter the necessary username and password when you click "Finish."
Step 7: Finish Setup
After configuring the settings, click "Finish." File Explorer will try to connect to the network drive. If everything is set up correctly, the new drive should appear under "This PC" with the drive letter you selected.
Method 2: Using Command Prompt
For users who prefer command-line interfaces, the following method involves using the net use command to map a network drive.
Step 1: Open Command Prompt
Press the Windows key, type cmd, and press Enter to open Command Prompt.
Step 2: Use the Net Use Command
Type the following command into the Command Prompt, replacing placeholders with your actual network path and preferred drive letter:
net use [letter] \\server\sharedfolder
For example:
net use X: \\192.168.1.100\shared
Step 3: Verify Mapping
To ensure the network drive has been successfully mapped, you can type net use to list all mapped drives or open File Explorer to see if the new drive letter is listed under ```markdown
Troubleshooting Common Issues
Even with a straightforward process, you may encounter some issues while mapping a network drive. Here are some common problems and their solutions to help you troubleshoot effectively.
Problem 1: Network Path Not Found
If you receive an error stating that the network path cannot be found, check the following:
- Verify the Path: Ensure that the path you entered is correct. Double-check for typos in the server name or folder name.
- Network Connection: Make sure your computer is connected to the network. You can test this by trying to access other network resources.
- Permissions: Confirm that you have the necessary permissions to access the shared folder. If you don’t, contact your network administrator.
Problem 2: Access Denied
If you encounter an "Access Denied" message, it may be due to insufficient permissions. Here’s what you can do:
- Check Credentials: Ensure you are using the correct username and password. If the shared folder requires different credentials, make sure to select "Connect using different credentials" during the mapping process.
- Contact Administrator: If you still cannot access the folder, reach out to your network administrator for assistance in gaining access.
Problem 3: Drive Not Reconnecting After Restart
If the mapped drive does not reconnect after you restart your computer, try the following:
- Reconnect at Sign-in: Ensure that you selected the "Reconnect at sign-in" option when mapping the drive. If you missed this step, you can remap the drive with this option checked.
- Group Policy Settings: In some cases, group policy settings may prevent drives from reconnecting. Consult your IT department if you suspect this is the case.
Problem 4: Drive Letter Already in Use
If you receive an error indicating that the drive letter is already in use, you can resolve this by:
- Choosing a Different Letter: Select a different drive letter that is not currently in use. You can check existing drives in File Explorer.
- Disconnecting Existing Mapped Drives: If you want to use the same letter, you can disconnect the existing mapped drive by right-clicking it in File Explorer and selecting "Disconnect."
Additional Tips for Efficient Network Drive Management
To make the most out of your mapped network drives, consider these additional tips:
Regularly Review Mapped Drives
Periodically check your mapped drives to ensure they are still relevant and necessary. Remove any that you no longer use to keep your File Explorer organized.
Use Descriptive Names
If you have multiple mapped drives, consider using descriptive names for the shared folders. This will help you quickly identify the purpose of each drive, making navigation easier.
Backup Important Files
While mapped drives provide easy access to shared resources, it’s essential to back up any critical files stored on these drives. Regular backups can prevent data loss in case of network issues or accidental deletions.
Stay Updated on Network Changes
If your organization frequently updates its network structure, stay informed about any changes that may affect your mapped drives. This will help you avoid disruptions in access and ensure you are using the correct paths.
Conclusion
Mapping a network drive is a simple yet powerful way to enhance your file access experience. By following the steps outlined in this guide, you can easily map a network drive in Windows 10 or 11, troubleshoot common issues, and manage your drives effectively. Whether you are working from home or in an office environment, having quick access to shared resources can significantly improve your productivity. Remember to keep your network paths updated and regularly review your mapped drives to maintain an organized workspace. Happy mapping!