How to Connect a Printer to a Network
Connect a Wi-Fi printer to your network, add it on Windows, or share a printer connected to a Windows PC.

Before you begin
Make sure the printer is powered on and supports the connection method you plan to use. For Wi-Fi setup, it must have built-in Wi-Fi.
Have your Wi-Fi network name (SSID) and password ready. Place the printer where it can receive a reliable signal.
Printer menus differ by model. Check the printer’s documentation for its exact controls and supported connection methods. HP’s Wi-Fi setup guide describes common methods, but not every option is available on every printer.
Connect the printer to Wi-Fi
Use the printer’s wireless setup menu
Turn on the printer and open its control panel or touchscreen.
Look for a menu named Setup, Network Settings, or similar. If the printer has a Wireless Setup Wizard, open it.
Select your Wi-Fi network from the list. Check the network name carefully, especially if nearby networks have similar names.
Enter the Wi-Fi password when prompted, then wait for the printer to confirm the connection.
If the printer offers a connection status or wireless indicator, check that it shows a successful connection.
Menu names and steps vary by model. If your printer has no screen or wireless setup wizard, consult its model-specific documentation rather than assuming these steps apply.
Use WPS if both devices support it
WPS is an alternative to entering the network password, but it is available only when the printer and router support it. Start WPS on the router, then press the printer’s WPS button within two minutes. Wait for the printer to indicate that it connected. If either device lacks WPS or the connection fails, use the wireless setup menu or the manufacturer’s model-specific instructions.
Add the network printer in Windows
Once the printer is connected to Wi-Fi, add it on a Windows computer that can access the same network:
Open Start > Settings > Bluetooth & devices > Printers & scanners.
Select Add device next to Add a printer & scanner.
Wait for the list to populate. This may take a few minutes. Select the printer and choose Add device.
When setup finishes, select the printer in Printers & scanners and print a test page if that option is available.
These menu paths are for Windows 11. The supplied Microsoft instructions cover this version; paths can differ in other Windows versions. See Microsoft’s instructions for sharing a printer for the Windows 11 steps and additional details.
Share a printer connected to a Windows PC
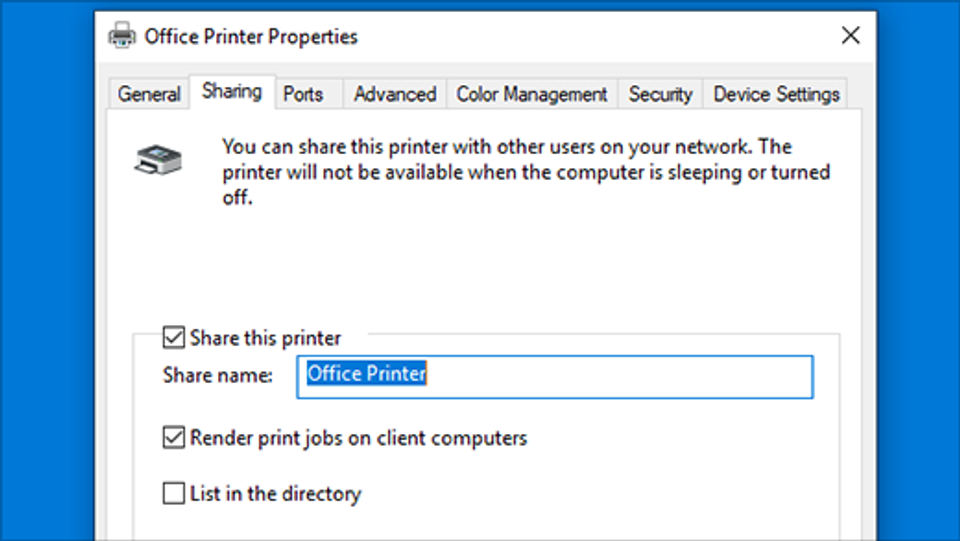
This is a different setup from connecting a printer directly to Wi-Fi. It shares a printer already installed on one Windows computer with other Windows devices on the same trusted network. The computer connected to the printer must stay powered on and connected to the network for other devices to use the shared printer.
Set up sharing on the computer connected to the printer
Confirm the printer is installed and working on that computer.
In Windows 11, open Start > Settings > Network & internet. Select Wi-Fi or Ethernet, then select the connected network. Under Network profile type, choose Private network only if this is a network you trust.
Open Settings > Network & internet > Advanced network settings > Advanced sharing settings. Under Private networks, turn on Network discovery and File and printer sharing.
Go to Settings > Bluetooth & devices > Printers & scanners, select the printer, then open Printer properties.
Select the Sharing tab, check Share this printer, note the share name, and select OK.
Add the shared printer on another Windows 11 device
Make sure the other device is on the same private network.
Open Start > Settings > Bluetooth & devices > Printers & scanners, then select Add device.
When the shared printer appears, select Add device. The list may take a few minutes to populate.
If it does not appear, choose The printer that I want isn’t listed and follow Microsoft’s instructions for adding a shared printer by the primary computer’s name or IP address and the printer’s share name.
Troubleshoot connection problems
The printer does not find your Wi-Fi network: Check that the network name is correct and that the printer is within range of the wireless signal. For model-specific compatibility or setup steps, use the printer manufacturer’s instructions.
The password is rejected: Re-enter the network password carefully. If you are unsure of the password, check with the person who manages the network rather than repeatedly trying guesses.
The printer connects but does not appear in Windows: Confirm the printer and computer can access the same network, then wait a few minutes and try Add device again.
A shared printer is missing: On the primary Windows computer, check that it is powered on, connected to the network, and sharing the printer. Verify that both devices are on the same trusted network and that network discovery and file and printer sharing are enabled for the private network.
The printer was moved or the network changed: Recheck its network connection and, if needed, run its wireless setup again using the correct network details.
Verify the setup
For a Wi-Fi printer, confirm the printer reports a wireless connection, then add it in Windows and print a test page. For a shared printer, confirm it appears on the other Windows device and can print while the primary computer is on and connected. If the steps do not match your printer’s menus, use its model-specific instructions; the supplied HP Wi-Fi guide is one reference for common wireless setup methods.