How to Protect Our Internet Browsing with Sandboxie
Step‑by‑step guide to install Sandboxie, run your web browser inside a sandbox, verify isolation, and safely delete the sandbox.

Prerequisites
Windows PC – Sandboxie runs on Windows 7, 8, 10, and 11 (any edition that supports standard user accounts).
Administrator rights – required for installing the program and creating new sandboxes.
Backup important files – before installing any system‑level software, back up documents, bookmarks, and any data you cannot afford to lose.
Internet connection – to download the installer and to receive updates via the Help Menu.
1. Install Sandboxie (Free version)
1.1 Download the installer
Open a regular web browser and navigate to the official Sandboxie website (search for Sandboxie download).
Choose the Free edition and click the download button.
Save the file, e.g.
Sandboxie-Setup.exe, to your Downloads folder.
1.2 Run the installer
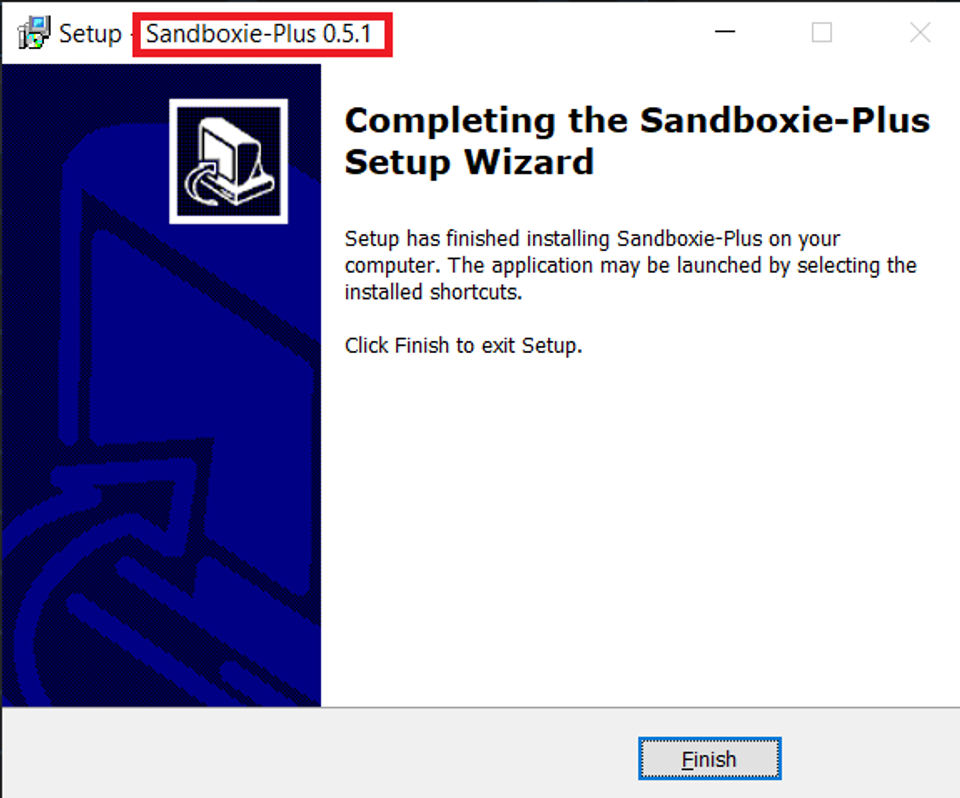
1. Double‑click `Sandboxie-Setup.exe`.
2. If Windows asks “Do you want to allow this app to make changes to your device?”, click **Yes**.
3. Follow the wizard: accept the license, keep the default installation folder (e.g. `C:\Program Files\Sandboxie-Plus`), and click **Install**.
4. When the installation finishes, click **Finish** to launch **Sandboxie Control**.
Note: The free edition does not include advanced features such as unlimited concurrent sandboxes or premium support. All steps below work with the free version.
2. Create a dedicated sandbox for web browsing
2.1 Open Sandboxie Control
The installer should have opened Sandboxie Control automatically. If not, open the Start menu, type Sandboxie Control, and press Enter.
2.2 Create a new sandbox
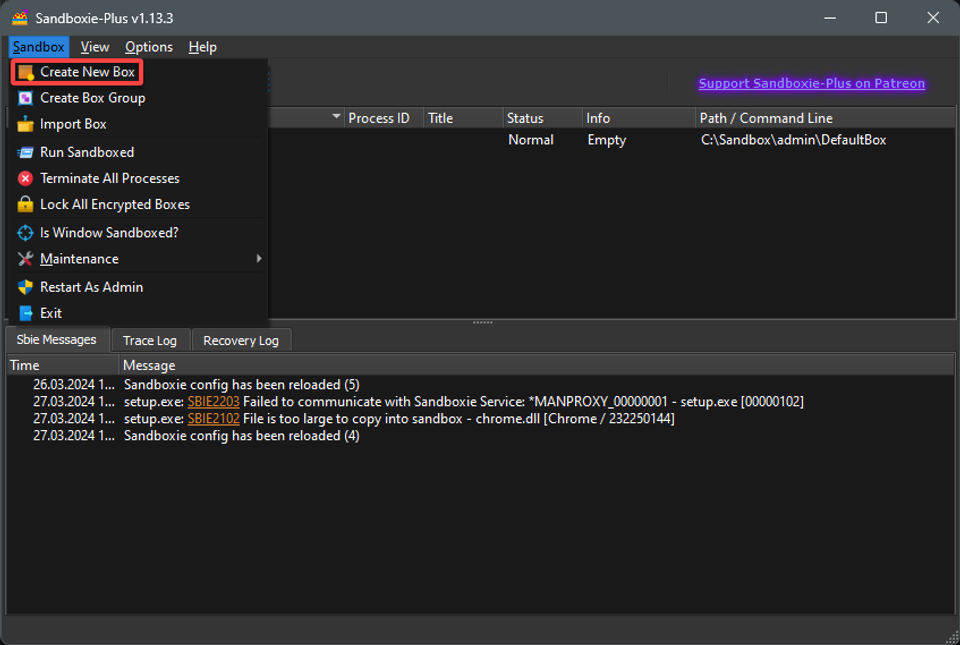
In the left pane, right‑click the DefaultBox (or any existing sandbox) and choose Create New Sandbox….
Type a name, e.g.
WebBrowserBox, and press Enter.The new sandbox appears in the list.
2.3 (Optional) Harden the sandbox
To prevent the sandboxed browser from writing to sensitive locations, edit the sandbox settings:
Right‑click
WebBrowserBox→ Sandbox Settings….Under Resource Access → Closed File Path, add paths you want to block, such as
C:\Windows\System32.Click OK.
The documentation notes that you can tighten privacy by configuring
ClosedFilePathandClosedKeyPath— see the FAQ for details.
3. Run your web browser inside the sandbox
3.1 Launch the browser via Sandboxie
Right‑click
WebBrowserBox→ Run Web Browser.A dialog appears asking whether the browser should run under Sandboxie (recommended). Click Yes.
Choose the browser executable, e.g.
C:\Program Files\Google\Chrome\Application\chrome.exeorC:\Program Files\Microsoft\Edge\Application\msedge.exe, and click Open.
3.2 Browse as usual
All pages, downloads, cookies, and temporary files are stored inside the sandbox’s virtual folder (e.g.
C:\Users\YourName\AppData\Local\Sandboxie\WebBrowserBox).According to the official documentation, "Running your Web browser under the protection of Sandboxie means that all malicious software downloaded by the browser is trapped in the sandbox and can be discarded trivially."
4. Verify that the sandbox is isolating your data
Open File Explorer and navigate to the sandbox folder shown in the status bar of Sandboxie Control (usually under
C:\Users\<User>\AppData\Local\Sandboxie\WebBrowserBox).You should see sub‑folders such as
AppData,Cookies, andDownloadsthat mirror what the browser created.Close the browser, then open a normal (non‑sandboxed) instance of the same browser. Your regular browsing history, cookies, and saved passwords will not appear, confirming isolation.
5. Clean up – delete the sandbox after each session
In Sandboxie Control, right‑click
WebBrowserBox→ Delete Contents.Confirm the prompt. All files created during the browsing session are removed, and any malware that may have been downloaded is discarded.
(Optional) If you no longer need the sandbox, choose Delete Sandbox to remove the configuration entirely.
The FAQ emphasizes that "deleting the sandbox is like removing the transparency layer, revealing the unchanged, real paper." This is the safest way to ensure no residual code remains.
6. Troubleshooting common issues
| Symptom | Likely cause | Fix |
|---|---|---|
| Browser fails to start inside the sandbox | An existing instance of the browser is already running outside the sandbox. | Close all non‑sandboxed instances, then retry Run Web Browser. |
| Files appear on the real hard drive (outside the sandbox) | The sandbox’s Closed File Path does not include the target folder. | Add the folder to Closed File Path in the sandbox settings and restart the browser. |
| Key‑logger alerts despite using Sandboxie | A key‑logger was already installed on the system before sandboxing. | Sandboxie cannot protect against already‑running key‑loggers. Run a full anti‑malware scan, then delete the sandbox and restart the PC. |
| Sandboxie Control crashes or does not open | Corrupted installation or missing system updates. | Re‑install Sandboxie (run the installer again) and ensure Windows is up‑to‑date. |
Where to get help
Open Sandboxie Control → Help → Help Topics (Web). The dialog will ask whether the help page should run under Sandboxie (choose Yes).
For update checks, use Help → Check For Updates.
If the problem persists, visit the official support page linked from the Help menu.
7. Best‑practice checklist (quick reference)
[ ] Verify admin rights and back up important data.
[ ] Install the latest free version of Sandboxie.
[ ] Create a dedicated sandbox (e.g.,
WebBrowserBox).[ ] (Optional) Configure
ClosedFilePathfor extra privacy.[ ] Launch the browser via Run Web Browser.
[ ] After browsing, Delete Contents of the sandbox.
[ ] Periodically run Check For Updates and keep anti‑malware software active.
Following these steps gives you a lightweight, reversible layer of protection for everyday web activity without needing a full virtual machine.